
Thursday, August 27, 2009

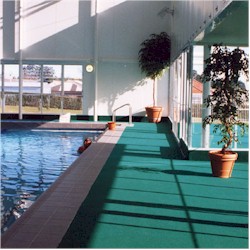
How To Install Outdoor Carpet

by: John Murray

Remember the 1970s when the only choice available in indoor - outdoor carpet was that wonderful [not] golf course green turf. It's no wonder that the word outdoor carpet sends shudders down a person's spine. But those days are gone.

Today there are a wide selection of both colors and textures from the very plush to the basic. You can even choose varying grades of carpet. So all that's left to know is how to install outdoor carpet.

Before we get into how to install outdoor carpet let's have a look at the tools you'll need. 50 lb Carpet Roller - optional but well worth the rental fee because of the nice tight seal it provides.

- Utility Knife - make sure the blade is sharp


- Straight Edge


- Adhesive Spreader


- Scissors


- Tape Measure

You will require the following materials

- Double faced carpet tape


- Adhesive


- Adhesive solvent [mild]


- Seam Adhesive


- Solvent To Ensure The Surface is Clean

Some things you should be aware of.

- If you are buying outdoor carpet that is going to be prone to dampness or serious wetness be sure the carpet has an all weather marine backing that is resistant to moisture.

- Outdoor carpet can be purchased in either 6 foot or 12 foot widths.

- Sundecks or areas that get a large amount of sun should be installed using a quality outdoor carpet adhesive to ensure there are no problems with rot or mildew.

- Adhesives are flammable so do not use around open flames, cigarettes, pilot lights, or any other source of flame.

Now to the main attraction, how to install outdoor carpet

1. Prepare your surface

Make sure you have properly prepared your surface by using a solvent to remove all grime and dirt. Let it dry out completely before installing the carpet. The best conditions for installing your carpet are in a humidity range from 10% to 65%, and temperatures between 55 F and 95 F.

2. Unroll

Unroll the carpet in the location where you are going to install it. Let is sit for an hour or two to allow for expansion.

3. Tape room

Take your two sided double tape and place the tape around the outer edge of the room on the sub floor. Make sure there is no more than a 2 foot spacing between each strip of tape. Leave the protective paper on the top side of the tape so as not to loose the adhesion.

4. Center It

Next center the carpet in the room. Position it so the edges are able to curl up against the wall. Allow at least 3" on each side. You can trim excess away later.

5. Cut A Ways

Trim around protrusion and outside corner edges by making a vertical slice down the carpet. Remember cutting a corner correctly makes installing your carpet much easier.

6. Inside Corners

To fit your carpet on inside corners you need to do a V cut where it over laps. Move slow and carefully when making these cuts so that you do not cut too far.

7. Seams

If your room needs to be seamed be sure you have the pile running in the same direction so that the seam is the least noticeable. You should overlap from 2 to 3 inches.

To make a double cut seam take your straight edge and utility knife and cut through both layers at exactly the same time using the tools together.

8. Wall To Center

Start against the wall and then fold the carpet back half way but don't move the half that still down.

9. Apply Adhesive

If you are doing a permanent installation this is when you will use your adhesive [make sure the room is well ventilated]. Take a notched spreader, apply adhesive, and then apply the adhesive to the sub floor. Follow instructions on the adhesive.

10. Unroll

Now slowly roll the carpet you rolled back earlier back into place. Smooth out any bumps and make sure you've got it lined up properly. If you were careful rolling it back all should be fine.

11. Repeat

Repeat the entire process above for the other side of the room now.

12. Carpet Roller

Now take your carpet roller [if you rented one] and run it across the entire carpet to get the adhesive to properly adhere all over the carpet.

13. Trim

Now is the time to use that sharp utility knife and trim away the excess on the edges around the outside of the room. Now is the time to clip any threads you see as well so that they don't start to unravel.

14. Clean Up

Clean away any excessive adhesive using a mild solvent. Follow the instructions provided by the manufacturer.

15. Connect The Dots

Or in this case connect the rooms. If you are laying outdoor carpet in more than one room use metal binder strips to cover the join.

That's it! If you followed these how to install outdoor carpet steps you should be an outdoor carpet layer pro by now! And think of all the money you saved not having to call in the pros. So what's your next project?

Improving your home and your life only at Home Improvement Idea : http://home-improvement-idea.blogspot.com

Wednesday, August 26, 2009

Give Your Room A Make Over With Sisal Rugs

by: John Murray

If you are looking to remodel and give your room a face lift by bringing it into the 21st century then you should have a look at Sisal rugs which are the perfect solution. They are affordable and will make your room beautiful. Why not give your room a make over with Sisal rugs.

The Agave sisalan cactus is used in the production of Sisal and it is found in brazil and Africa. Its long fine fibrous qualities allow it to be spun into a smooth but textured yarn. The fibers are tough and they are durable making Sisal rugs a versatile choice for any room and a perfect choice for high traffic areas.

Like wool it has natural anti static qualities and it is fire retardant and long wearing fibers. It's natural colors range from creamy white to pale yellow but may be dyed a variety of colors. The natural colors are beautiful on their own. Your Sisal rugs will also breath so they are great for regulating the humidity level in your room.

Sisal can also be blended with wool to may a hybrid type rug. It's an excellent match giving you the top qualities of both textile fibers.

Caring for your Sisal carpet is very similar to caring for an Oriental rug. If it is located in a high traffic area you should vacuum it daily. If it is in a lower traffic area then you can vacuum it less often. Stains needed to be acted on very quickly so as to not set into the carber. Do not soak these rugs as they will retain a water stain after cleaning. You need to purchase carpet cleaner that is specifically designed for Sisal rugs.

Sisal rugs have become so popular because they are so versatile and so durable. Most often they are used to as a cover or focal point on hardwood floors but they can be used over carpet, linoleum, or any other way you wish. They also work very well to hide wear or stains on the main carpet. Stains and wear usually occur in the high traffic areas which is also usually a great place to put a rug giving you a new look to your room while covering the wear.

There are many styles, sizes, shapes, colors, and textures in Sisal rugs. They can be used to give a room a facelift, a new focal point, hide wear. They look great in the center of a living room, near a fireplace, under a dining room table, or in a bathroom or bedroom.

An ancient technique with a very modern and contemporary style makes it a perfect choice for a modern contermporary room. If you are looking to create a warm and inviting environment the Sisal rugs can do that for you too.

Because they are easy to maintain and because they are so durable they are a great choice for heavy traffic areas. They can take quite a beating and still look fresh and new.

You'll find many home builders choosing Sisal rugs to accent the tile or hardwood. They are the favorite choice over Oriental or Persian rugs because they are so affordable and they fit so well into a contemporary room.

So whether you are building a new home and adding rugs or giving a room a facelift be sure to consider Sisal rugs. They are great value for the price!

Improving your home and your life only at Home Improvement Idea : http://home-improvement-idea.blogspot.com

How To Do A Carpet Repair

by: John Murray

It's almost inevitable that at some time you will need to do a carpet repair. There are two common types of carpet repairs that professionals will do for you or that you might do yourself. They are restretching and cut and plug. Find out how to do a carpet repair.

Restretching your carpet will give it a face lift removing the wrinkles. It will also extend the life of our carpet which would otherwise wear along the buckling. You will need a knee kicker which you can rent. The steps to restretching your carpet are as follows:

- Unfasten carpet from the walls remove baseboard


- Use your knee kick to kick the carpet tight in one direction


- Tack it down then kick the carpet in the other direction and tack it down.


- Any excess can be trimmed away


- Replace baseboard.

Cut and plug is used when small areas of a carpet have been stained, burned, or damaged some other way. The damaged piece is cut out and a piece of matching carpet is put in to replace it. Before you begin you will need matching carpet remnant , utility knife, empty can, utility knife, work gloves, single-sided carpet tape, painter's tape, marker, and scissors. Then follow these steps to do a cut and plug job.

1. Cut out the damaged area - put your gloves on to protect your hands, then use your empty can to cut a nice round cut out with your utility knife

2. Find a new piece of carpet that matches

3. Cut out to fit the area you've removed. Put your gloves on to protect your hands, then use your empty can to cut a nice round cut out with your utility knife - called the plug.

4. Use tape marked with an arrow to mark the direction of the carpet's nap on the piece you cut out. Then use another piece of tape to mark the nap just outside the cut out on the regular carpet.

5. Place the adhesive tape on the back of your new piece.

6. Remove the protective cover on the new cut out and align it correctly into the cut out.

7. Once you're sure everything fits well and aligns properly place the balance of your adhesive tape on the new piece.

8. Lay into place and apply firm pressure to assure the adhesive sticks.

9. Now you'll notice the new piece looks like it has a higher nap. That's because it isn't worn. You'll want to place a heavy stack of books or something similar on the repair to flatten the carpet. Leave there for at least a few days.

10. Remove the heavy objects and check for any loose or fraying edges. Trim away if necessary.

11. Check to make sure your adhesive has taken hold especially around the edges. If you require more now is the time to do it.

12. Sit back and relax. You've done a fine job.

That's it. Not too hard at all. Just follow these simple steps and you'll have your carpet repaired in no time.

Improving your home and your life only at Home Improvement Idea : http://home-improvement-idea.blogspot.com


  • Toilet and Us - Toilets are an important part of our daily lives. We tend to take the toilet is easy and not really thinking about it too much until we find that we reall...